Keep Your RV Secure: Essential Maintenance Plans for Electronic & Mechanical Locks

Your RV is your home on the road, and its locks are the first line of defense. Whether you rely on a modern electronic lock or a traditional mechanical lock, proactive RV lock maintenance is non-negotiable for safety, reliability, and longevity. Neglect can lead to frustrating lockouts or security failures. Below is a targeted maintenance plan for both lock types.

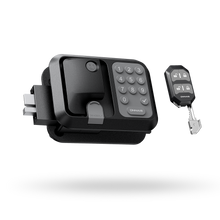
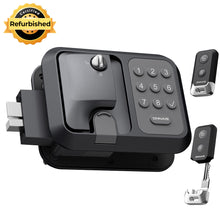
Part 1: Electronic Lock Maintenance Plan
Thrives on vigilance and tech-savvy care.
Regular Inspections (Monthly/Before Trips):
Battery Check: Test voltage monthly; replace batteries every 6-12 months (or when alerts sound). Always keep spare batteries in the RV.
Keypad/Scanner: Inspect for cracks, moisture damage, or unresponsive buttons.
Mechanical Components: Ensure the bolt extends/retracts smoothly without grinding.
Wiring (if hardwired): Check for fraying or corrosion.
Cleaning (Quarterly):
Gently wipe the keypad/fingerprint scanner with a dry microfiber cloth. For stubborn grime, lightly dampen cloth with isopropyl alcohol (avoid liquids near seams).
Clean the bolt strike plate and surrounding frame area to prevent debris buildup.
Lubrication (Bi-Annually):
Electronic locks still have moving parts inside the latch or bolt.
Apply a small amount of lock-specific lubricant (graphite or Teflon-based) to the mechanical components, avoiding any electronic contacts.
Do not use oil-based lubricants that attract dust.
Part Replacement & Troubleshooting:
Replace batteries proactively before long trips.
If keypad fails but lock has a backup key, use it immediately and diagnose (check connections, reset lock per manual).
For persistent electronic glitches (error codes, unresponsiveness), consult a specialist – DIY repairs risk further damage.
Security Check (Bi-Annually):
Test all access methods (code, key fob, mechanical override key) at least once a month.
Confirm the lock engages fully when the RV door is closed.
Check for any delays in locking/unlocking, which could indicate mechanical binding or low power.
Part 2: Mechanical Lock Maintenance Plan
Built for toughness, demands simplicity.
Regular Inspections (Quarterly):
Look for signs of rust, corrosion, or cracks in the lock body.
Ensure the key turns smoothly without sticking.
Examine strike plates and screws to make sure they are tight.
Cleaning (Bi-Annually):
Remove visible dirt/debris from the keyway using compressed air (canned air works). Never use water!
Wipe down the lock cylinder face and handle.
Lubrication (Bi-Annually):
Use dry graphite powder – the gold standard for mechanical locks.
Apply sparingly: Insert the straw nozzle into the keyway and puff 1-2 times. Insert and remove the key several times to distribute.
Apply a tiny amount to the bolt mechanism if stiffness occurs.
Avoid WD-40 or other oil-based sprays, as they can gum up over time.
Part Replacement & Troubleshooting:
Re-keying: If keys are lost/stolen, re-key the lock immediately (a locksmith can do this affordably without full lock replacement).
Worn Keys: Replace heavily worn keys – they can damage the lock cylinder over time.
Sticking/Binding: Usually resolved by cleaning and graphite. If persistent, suspect internal wear – consider replacement.
Security Check (Annually):
Physically test the lock’s resistance by trying to jiggle the door when locked.
Tighten all mounting screws on the lock body and strike plate (RV vibration loosens them!).
Ensure strike plate is securely anchored into a solid part of the door frame.
General Maintenance Tips for Both Lock Types
Regardless of whether your RV uses an electronic or mechanical lock, the following RV lock maintenance tips apply to both:
Keep Spare Keys and Access Codes Safe – Store backups in a secure location away from the RV.
Protect from Extreme Weather – Use covers or shields if your locks are exposed to heavy rain, dust, or freezing temperatures.
Avoid Slamming the Door – This can misalign the latch or damage internal components.
Document Maintenance – Keep a simple record of when you last performed cleaning, lubrication, part replacement, and safety checks.
Act Quickly on Issues – Small problems like a sticky key or slow keypad response can become full lock failures if ignored.
Sample RV Lock Maintenance Schedule
| Task | Frequency | Applies To |
|---|---|---|
| Visual inspection | Monthly | Both |
| Cleaning | Every 3 months | Both |
| Lubrication | Every 6–12 months | Both |
| Battery replacement | 6–12 months | Electronic lock |
| Key replacement | As needed | Mechanical lock |
| Firmware update | When available | Electronic lock |
| Safety check (all functions) | Monthly | Both |
Conclusion
A well-maintained lock is the difference between a secure RV and an easy target for theft. By following a clear maintenance plan for both electronic locks and mechanical locks, RV owners can ensure their locking systems remain reliable, safe, and long-lasting. Regular inspections, cleaning, lubrication, part replacement, and safety checks are simple steps that pay off in peace of mind.
Whether you prefer the tech convenience of an electronic lock or the rugged simplicity of a mechanical one, good RV lock maintenance habits will keep your home-on-wheels secure for years to come.